The home kitchen continues to evolve to meet our ever-changing needs and wants.
Today, we’re as likely to have a TV or computer in the kitchen as a microwave or breadmaker.
The “kitchen work triangle’ – the relationship between refrigerator-range-sink remains the foundation of good kitchen design, to store, prepare and serve food, along with the inevitable cleanup.
But our busy lives – fueled by attractively-packaged, processed-for-our-convenience food – means we also have to deal with a whole lot more kitchen waste than our grandparents could ever imagine.
Which brings me to….
The trash triangle
Every bit of food we consume (or even worse, don’t) generates waste of some sort. And we have to cope with all those wrappers, peelings, and containers at the precise point where they cease to be “packaging” and suddenly become “waste” – which is inevitably smack-dab in the middle of the work triangle.
What we do with this newly-created waste largely depends on individual whim and our personal environmental conscience, but ideally we should ask ourselves…
Is it Trash?
Is it Recycling?
Is it Compost?
Location, location, location
 While there’s a long, convoluted chain of events that follow in getting all this waste to it’s final destinations, I’m only going to focus on the immediate problem – you need to put the waste you’re holding in your hand… somewhere else.
By far, most kitchen waste falls into the “trash” category. Meat packaging, plastic wraps, food scraps and the like need to go directly into the trash bin. As you can see by the kitchen layouts for recent clients I’ve included – I try to locate a pullout trash bin within a couple of steps of the sink and the range – since this is where most of the action is, during both cooking and cleanup.
Depending on how much space you have, you may need or want to combine your trash bin with recycling or a compost bin. Compost bins should be within reach of the sink where you usually prepare fruit & vegetables. Space needed for recyclables may vary depending on the extent of your local recycling program and you may want to relegate the recycling to the mudroom when possible.
Buy or build your own?
 There are hundreds of different pullout trash, recycling and compost bin hardware configurations available commercially.
Ready-to-install pullout bins offer a quick and easy solution. Prices vary a lot depending on what you need.
Anyone with a few basic DIY skills could buy a couple of inexpensive plastic bins, some drawer slides and the wood needed for about half the cost of some ready-made commercial units.
Whether you buy a commercial unit or build one yourself ultimately comes down to a decision between your needs, your wallet and your DIY mojo.
Talking trash (pullout) tips
 Here are a few more things to consider whether your planning a complete kitchen reno or adapting an existing cabinet for the purpose.
Renovation Planning
If you’re in the planning phase of a complete kitchen makeover, give the “trash triangle” some serious thought as part of the overall design.
- The compost bin should be close to a sink, cutting boards and knives.
- Packaging and food scraps are likely to be discarded near the range or sink so locate the trash in a convenient place in between.
- Kitchen recycling bins are mostly a convenient drop-off point and get sorted later into larger bags or bins for roadside pickup. If working space is tight, consider locating recycling bins outside the work triangle where there may be more space closer to the door.
Adapting an existing cabinet
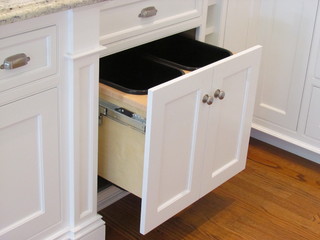
If you want to work a pullout trash bin into your existing kitchen, take stock of what potential cabinets could be adapted to the purpose. Ideally, you’d want a 14″ to 24″ wide drawer over door cabinet located in the sweet spot between the sink and the range.
 A narrow cabinet (12-16″ opening) can hold one small trash bin with it’s short side out. A wider cabinet (18- 24″ could hold a pair of good size bins either side by side or one in front of the other. Assess your options for cabinet space and shop for bins that would fit.
The concept is to remove the door hinges, build and install the bin pullout and attach the door to the front of it – just like that, you have a pullout trash bin.
5 tips for success
- Remember you need room for drawer guides and the frame to hold the bin. Allow at least 2 1/2″ of opening width for these (1/2″ for each guide, 3/4″ for each frame side).
- Face frame cabinets may need side spacers to bring the drawer guides flush to the frame opening.
- Look for full extension guides to make sure the rear bin of a two bin pullout can be removed without fetching up on a drawer pull or countertop.
- A deep frame for the bins (8-9″h) will reduce the amount of stress where it connects to the door and stand up better to the thousands of times it will be used every year.
- For full-height doors, add a rollout or shelf above the bin to hold spare garbage bags & ties.
Plastic Laminate top
Nobody’s perfect. That also applies to a human’s ability to toss messy wrappings and scrape leftovers accurately into a wide-open garbage bin.
 If you’re making a pullout yourself or having a cabinetmaker build one for you, you’ll be a happier camper if you add plastic laminate to the top of the pullout surrounding the bins with no cracks or edges to collect gunk.
You should be able to get a small piece of countertop laminate from a cabinet maker or building supply centre for a just a few bucks.
Related posts:
Recess Your French Door Fridge into the Wall
Kitchen Seating – How Much Knee Space Do I Need?
Kitchen Planning – On Pets & Pantries
First Image: Houzz.com


I have had cabinets painted several months ago. My pullout trash recycling drawer top area is chipping. Now I’d like to repair and modify that area so it has more protection since used so often. Any ideas of something already designed to apply on the drawer where it closes. Thanks